Adding more power to your FAST Nano-controlled pinball machine
Wiring, high voltage, and electricity can be dangerous. Read this first!
The voltages and electricity discussed here can be dangerous and could cause property loss or death. It is your responsibility to ensure you are aware of these risks and comfortable with these processes. Furthermore your local jurisdiction may have regulations or rules which differ from what we discuss here, including wiring colors, standards, techniques, etc. Although based on broadly adopted methods, FAST Pinball does not employ Professional Engineers and this information is not professional recommendations. There may be errors, omissions, or typos here. Any pinball machine available to the general public should be reviewed by a licensed Professional Engineer in your region. Use this content at your own risk.
This guide is old (for FAST Nano-powered machines only)
This wiring guide is for pinball machines powered by a FAST Nano Controller. If you have a FAST Neuron Controller, please see the Neuron wiring guide.
Depending on what you have in your pinball machine, you may find that you need more power than what the standard power supplies we recommend can support. This is most common for LEDs. The Mean Well RD-65A PSU we like provides up to 6A of 5V power.
That said, having 6 amps of 5V should be plenty for most machines. Since LEDs are the biggest consumer of 5V power in a pinball machine, you can look at the specs of the WS2812 LED module used in pinball and see that with all three channels (red, green, and blue) all on at full brightness, each LED can take 50-60mA. This means 100 LEDs in your machine would be 5000-6000mA which is 5-6A, pushing the limit of the PSU.
Before you rush out to buy a bigger PSU, be aware that WS2812 LEDs on full white full brightness are really bright. Like, really REALLY bright. Like, jumbo jets will attempt to land in your yard bright. Even at less power, 80%, for example, WS2812 LEDs are still REALLY bright.
The other thing to consider is that the LEDs only consume their full power when all three elements (red, green, and blue) are on full brightness, which means they're white. How often are you going to have every LED in your machine on bright white?
And finally, since all your LEDs will be showing all different colors, and flashing and fading constantly, and remember that a slow-blow fuse can go over its rated current for a short amount of time, you most likely have plenty of headroom in terms of LED power consumption. So the reality is that with actual usage, you most likely won't see your LED demands anywhere close to the max. The FAST Nano controller supports up to 256 WS2812 LEDs, and in most cases the PSU we like that supports up to 6A at 5V is fine.
Our recommendation is to go with the 6A/5V PSU initially, and work on building your machine. If you get to the point where 6A is not enough, (because you keep blowing 5A fuses—remember the fuses should be less than the PSU rating), then you can decide what to do next. (Set lower max brightness, add a bigger power supply with an additional 5V circuit, etc.)
Also, to be very clear, the issue of not having enough current to power your LEDs is NOT the same issue as the voltage drops and wrong LED colors on long LED chains. The discoloration / voltage drop is due to resistance in your 5V power line in your LED chain. You solve that issue by attaching more power to the end of the chain and/or via middle-of-chain power feeds. If you have long chains of LEDs then you'll have to do this even if your total LED current draw is under 6A. (See the LED wiring guide for details.)
12A of 5V power
If you determine that you need more than 6A of 5V power, you can double that up to 12A without much effort and in a safe way by swapping out to a more powerful 5V PSU and then using the additional V2 circuit on the power filter board. Follow along in the diagram below as we step through this. (Click to zoom)
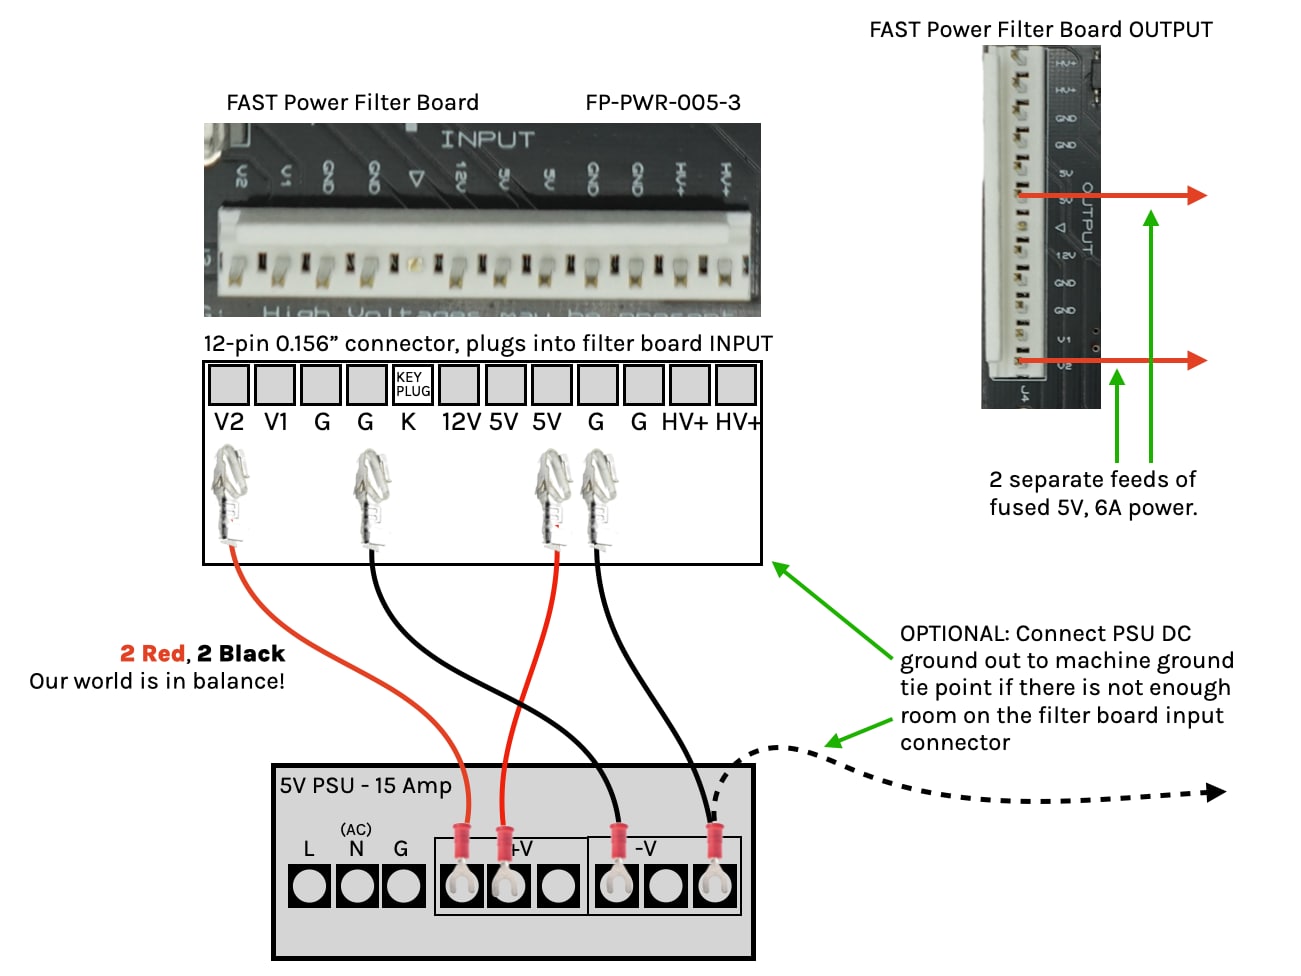
- Select a replacement 5V DC PSU with enough current. Remember you want all the fuses of all your branch lines to add up to LESS than the rated value of the PSU (since you want your fuses to blow before you damage the PSU), so if you're thinking about 12A of machine power, maybe look for a PSU that has around 15A of 5V DC power. (There is complexity around adding a second 5V PSU if you don't know what you're doing, which is why we recommend replacing the existing 5V PSU with a more powerful one versus adding a second 5V PSU)
- Run one +5V DC red power wire (18 gauge) from the PSU DC output to one of the
5Vpins on the filter board INPUT header. Install a fuse into the 5V fuse holder on the filter board that's sized appropriately. (Perhaps 5A?) Now the5Voutput header is your 5V Feed #1. - Run a second +5V DC red power wire from the PSU DC output to the
V2input pin on the filter board. Select and install an appropriately-sized fuse in the "V2" fuse holder slot. Now theV2output pin is your 5V Feed #2. - Run a second ground wire from your 5V DC PSU output to one of the
GNDinputs on the filter board. If you do not have any remaining pins, then run the second ground wire from the DC output on the PSU to the ground tie point. Why? We need to ensure your ground wires have enough capacity to balance out the +V wires, so if you add another +V wire, add another ground wire.
Now you have two feeds of 5V power for your LEDs. Note that since both of these feeds come from the same PSU, you CAN mix and match them in your machine. (For example, it's ok if the power into the Nano comes from 5V Feed #1 and the additional power tap at the end of an LED chain comes from Feed #2.)
What if you need more than 12A of 5V?
If you determine that you need more than 12A of 5V power, your next move would be to consult an electrical engineer, because this amount of 5V power adds significant electrical system complexity, and most of the design decisions will be specific to your machine, your use case, and the regulations which apply to your situation. So, while it's absolutely possible to use more than 12A in a pinball machine, it's impossible for us to provide generic guidance here. (Plus an electrical engineer will also help you determine whether you really need that much current at 5V, which can be pretty dangerous, or if you can convert some of that to 12V, etc.)
For example, will you use really thick wires that can support more than 12A of current? But then what connectors do you attach them to since the FAST Power Filter Board and its 0.156" headers are designed to max out around 6 or 7A. Or will you use several smaller-diameter wires to share the load, but then how are you ensuring that a single disconnected power wire doesn't shunt too much current to the others and cause them to overheat and fail too. And what about your ground returns with all that current? What if one of them becomes disconnected? Do you protect those grounds with fuses? What about safety ground if your power ground fuses blow?
These are all solvable questions, of course, but they need to be solved by a qualified electrical engineer who can help you with your specific scenario if you truly need more than 12A of 5V power (which again you probably don't).
Multiple 12V lines
The 12V/5V PSU we like supports up to 3A on the 12V output. Remember that "power" (measured in watts) is the product of voltage and amps. So since 12V is about 2.5x 5V, then 3A @12V is about the equivalent of (3*2.5) 7.5A @5V. The reason we mention this is that while it's certainly possible that you'll need more current than the default, things running at 12V don't typically need as much current since they have more voltage.
If you add up all the things that require 12V in your machine, what would that include?
- FAST Controller
- FAST Audio Interface / whatever amp you're using
- RGB DMD
- Segment displays
- LCD screens
- Opto emitters
- Shaker motor
- What else?
If you determine that you need more than 3A of 12V power, you can safely go up to about 6A or so just by switching out to a higher current power supply, since the 18 gauge wires, 0.156" connectors, etc. can support the additional load. (Just change the fuse from a 2.5A or whatever would be in there before with a 5A or 6A one.)
Given all this, the need to run an additional 12V line is not nearly as likely as the 5V.
Multiple high voltage +48V lines
Before determining whether you need additional +48V DC lines, it's important to understand how your 48V power is different than the 12V and 5V power lines.
First is the fact that your 48V power will mostly be used at extreme limits. It will be almost nothing for most of the time. (A flipper hold or diverter hold do not take much current at all, especially at 48 volts.) But when a coil fires, it will need a LOT of power (possibly over the 6A or 7A, which is why the fuses are slow blow), but for a very short amount of time, just a few tens of milliseconds for most coil pulses.
So the 48V is like: almost nothing ... nothing ... nothing ... almost nothing ... nothing... OH MY GOD WE NEED 15A RIGHT NOW FOR 14ms STAT!!!!! ... nothing ... nothing ... almost nothing. Compare this to the 5V power, which if you have hundreds of LEDs could be consuming 12A consistently for minutes or hours straight.
This is why the high-voltage power lines through the power filter board have those huge capacitors attached. They will kick in additional power when the voltage drops due to the high current draw from the 48V devices.
So when you're designing your 48V power, the pressing issue is not going to be the max number of amps you need to support, rather it will more be about making sure you have enough distribution lines so that you don't get too many high-current draw devices firing at the same time on the same line. (This is discussed in more detail in our guide to coil wiring.)
Note that you may end up in a situation where you need to connect multiple wires to a single screw terminal. This is generally fine as long as you fuse your lines appropriately and ensure that the number and types of connectors are within the published ratings. See the "Note about connecting multiple wires to a single screw terminal" earlier in this guide for details.
Use the HV and V1 lines on the filter board
This has been mentioned elsewhere, but one important thing about your +48V DC line is 48V is the only high-voltage in your machine, you should plan to use both the HV+ and V1 lines for +48V DC power feeds. Here's the PSU to filter board diagram again which shows this:
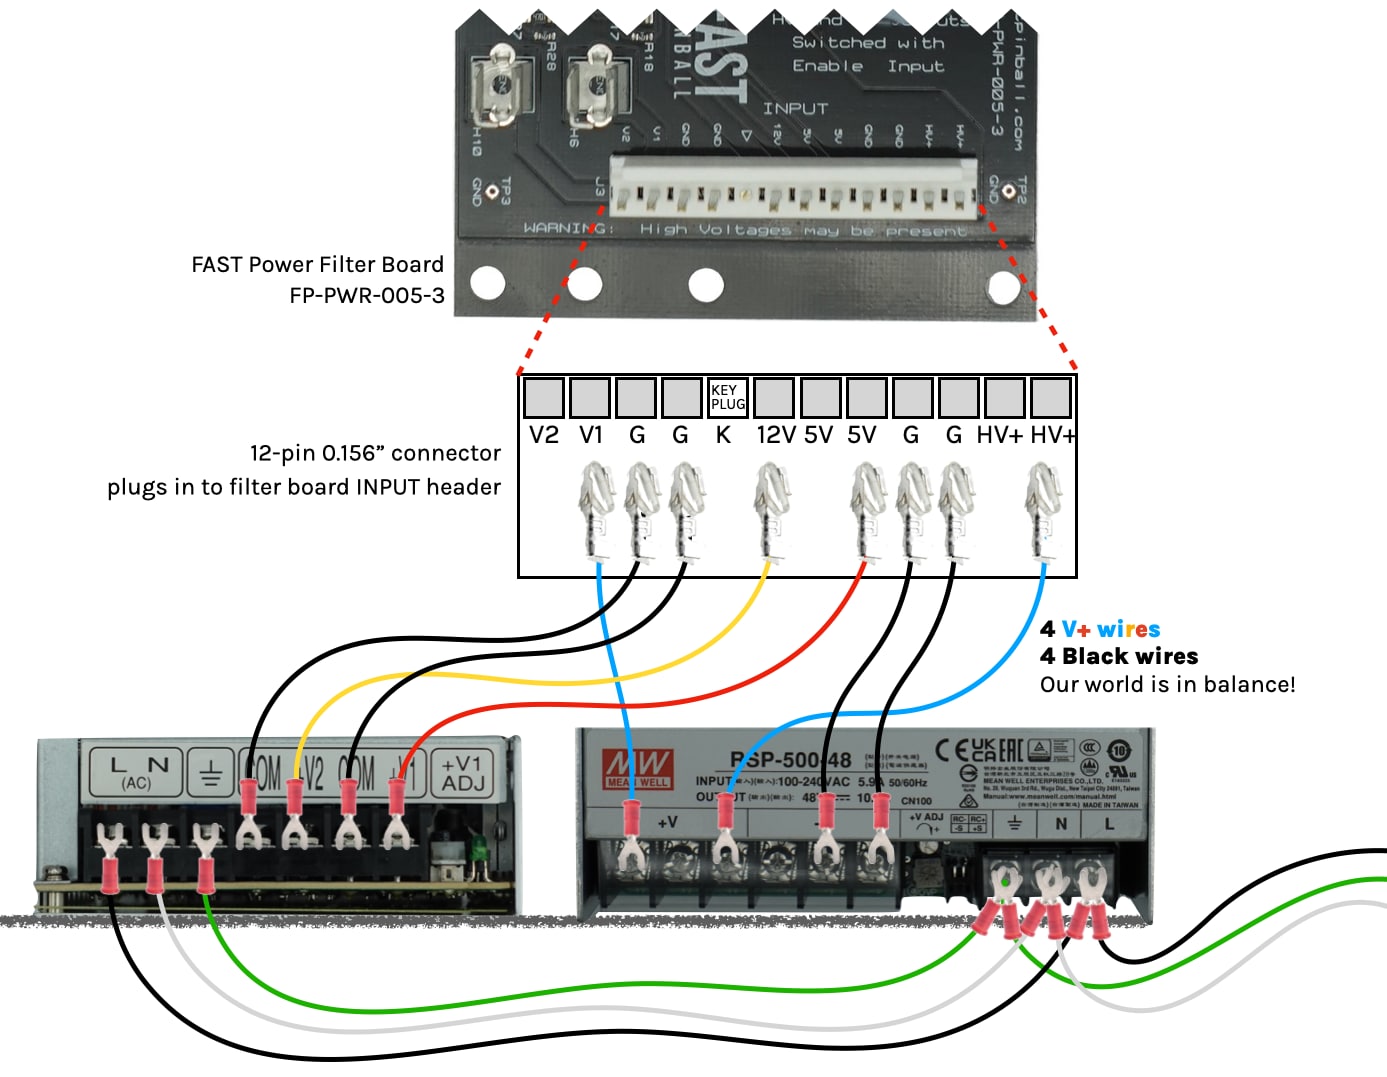
Note the two +48V DC blue wires from the 48V PSU outputs: one goes to the HV+ input and one goes to the V1 input. Then on the OUTPUT side of your filter board, you'll have three blue 48V lines you can run to your various coils, magnets, motors, etc. (Again details for this are in our guide to coil wiring.)
When you wire the filter board like this, all three giant capacitors work together and provide reserve power across all three lines.
If you find that you need more power (perhaps you have six or eight flippers which could all fire at once, or maybe four flippers, a few strong magnets, and a shaker motor) then you might end up needing to add a second filter board. (You would have to do the math to see if you would need a 48V PSU that could provide more current. You might only need the additional filter board.)
In that case, you could daisy chain the switch output of one to the enable switch of the other so you still control the both with a single switch, and you could run multiple wires from your PSU to the filter boards and then onto your machine. But this is unlikely, and you should proceed with the single filter board until you actually experience a power-limiting issue.
This guide is part of our complete series on wiring your FAST Nano-controlled pinball machine. Click to see the rest!
Wiring guides for FAST Nano-controlled pinball machines
We have many guides and a complete wiring walk-through for your entire pinball machine powered by a FAST Nano Controller. Please read and understand all of the wiring guides before you start planning and physically wiring your machine.
Baseline wiring skills & knowledge
Important wiring and electrical background information you need to know before you start planning your machine's wiring.
FAST Nano-controlled Pinball machine wiring guides
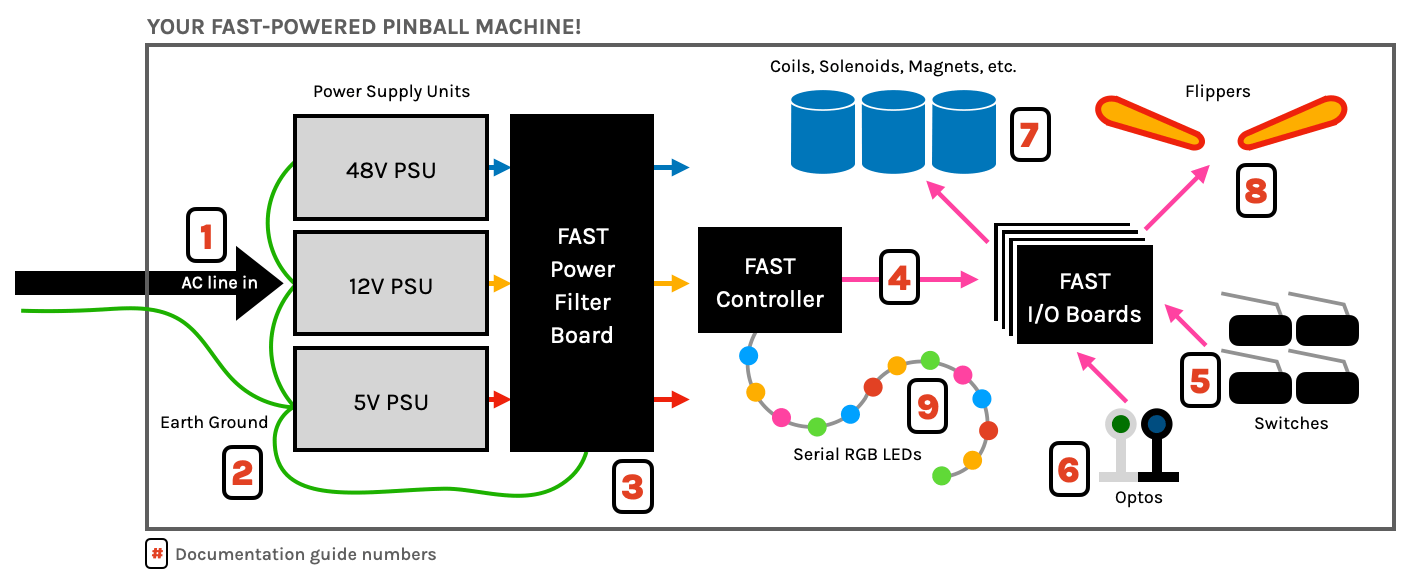
The guides below walk you through a complete machine wiring, section-by-section. The numbers in the drawing match up to the numbers in each diagram. We assume you follow these in order. Click the image to zoom in.
N or > jump the next page, P or < for previous, search with S or ?