How to wire your flippers in a FAST Nano-controlled pinball machine
Wiring, high voltage, and electricity can be dangerous. Read this first!
The voltages and electricity discussed here can be dangerous and could cause property loss or death. It is your responsibility to ensure you are aware of these risks and comfortable with these processes. Furthermore your local jurisdiction may have regulations or rules which differ from what we discuss here, including wiring colors, standards, techniques, etc. Although based on broadly adopted methods, FAST Pinball does not employ Professional Engineers and this information is not professional recommendations. There may be errors, omissions, or typos here. Any pinball machine available to the general public should be reviewed by a licensed Professional Engineer in your region. Use this content at your own risk.
This guide is old (for FAST Nano-powered machines only)
This wiring guide is for pinball machines powered by a FAST Nano Controller. If you have a FAST Neuron Controller, please see the Neuron wiring guide.
Yay! After what probably feels like five million words of instructions, it's finally time to wire up your flippers! 🎉
There are a few different options with flippers:
- Dual-wound versus single-wound coils?
- Will you use EOS (End of Stroke) switches?
- Will your flipper buttons be opto or mechanical?
- If you have more than two flippers, how will they be controlled?
We'll walk through the options and explain how to wire them in this guide. If you just want the highlights of our recommendations, we recommend:
- Dual-wound flipper coils
- With EOS switches
- Mechanical flipper buttons (not optos)
- Dual-stage flipper buttons for upper flippers
Single versus dual-wound flippers
Fundamentally a flipper is controlled by a coil just like anything else in a pinball machine. What makes it unique is that it needs to:
- Be powerful enough to hit the ball fast and all the way to the top of the machine.
- Be held on the "on" position for an unlimited amount of time without burning up the coil.
Usually in pinball these are mutually exclusive. Very powerful coils, like an autoplunger or VUK have enough power to shoot a pinball through your wall, but they're only pulsed for a few tens of milliseconds and if you held them on longer than that they'll heat up and melt. Other coils which are designed to be held on, like diverters, up/down posts, controllable ball gates, etc. are low power since the thing they're mechanically moving is not under load and doesn't need to be shot uphill. So they can stay on forever but if you tried to move a ball with them it wouldn't go very far.
Therefore the coils that control flippers in pinball machines combine both techniques.
Dual-wound flippers
Most flippers in pinball machines use special "dual-wound" coils, which are like two coils in one. One of the windings is strong and powerful and only used for the initial kick, and the second winding is much weaker (and requires far less power) which is only used to keep the flipper held in the "up" position. You can tell if you're looking at a dual-wound coil because it will have three solder lugs instead of two. (One lug for the high power main winding, a low power hold winding, and a common lug that's shared by both.) You can look at the copper wire used for the windings to see which lug is which. One wire will be thick—that's your main power winding. The other will be thin, which is for your hold winding. And the third lug will have the other ends of both wires (so two wires connected, one thick and one thin) which is your common winding.

Single-wound flippers
The other flipper type is just to use a single powerful coil with one winding. Obviously that winding has to be strong enough to have the power to send the ball flying, but also it needs to not burn out. So when you see single-wound flippers in machines (new Sterns, for example), the electronics control system will fire that flipper at full power for the initial kick (maybe 15 milliseconds?), and then once the flipper is in the full "up" position, it dials the power way back (maybe down to 25% or so) to keep the flipper in the up position while not burning up the coil.
Which is better: dual- or single-wound?
There are pros and cons to each flipper coil type, and you'll find both types in modern commercial machines.
From a homebrew perspective, the biggest challenge to using single-wound coils is dialing in the "hold" power level so that it's strong enough to hold the flipper in the up position when a fast-moving ball hits it, but not too strong that the coil heats up (which will increase the resistance and cause weak flips and/or melt the coil). Stern can get away with single-wound coils because they have a whole team of electrical engineers who can do all the math and then specific the exact number of windings they need in their flipper coils. But that can be tough for a homebrew maker who has to buy whatever coils are available.
Single-wound coils can also cause EMI issues since the hold position is pulsing 48 volts on and off really quickly, and the wires from the board act like antennas to broadcast this into the world.
Dual-wound flipper coils solve all of these problems. There is no PWM in the hold position and it's just pure clean power for the power stroke and hold. You don't have to try to calculate hold strengths, power changes due to heat, or worry about EMI. Dual-wound flippers "just work" and have been in pinball machines for 70 years. They are proven and solid.
The only downside to dual-wound flippers is that each flipper requires two driver control connections, since from the FAST I/O board's standpoint, the power winding and hold windings are two different drivers to control. So that means that two flippers in your machine will consume four I/0 board driver outputs instead of just two. Commercial manufacturers building thousands of machines might be interested in saving those few dollars per machine, but for a homebrew machine it's easier to use two driver outputs for each flipper and be done.
Therefore our recommendation is to use dual-wound flippers.
EOS (End of Stroke) switches
An end of stroke switch is a switch that's part of the flipper mechanism which changes state when the flipper reaches the end of its travel and is fully in the "up" position. In the old days the EOS switch was used to bypass or disable the high power coil winding while keeping the hold winding energized. Here's an image of an EOS switch from a modern FAST-powered machine. (The metal bracket is reflective if you're wondering why it looks like the switch has three legs.)
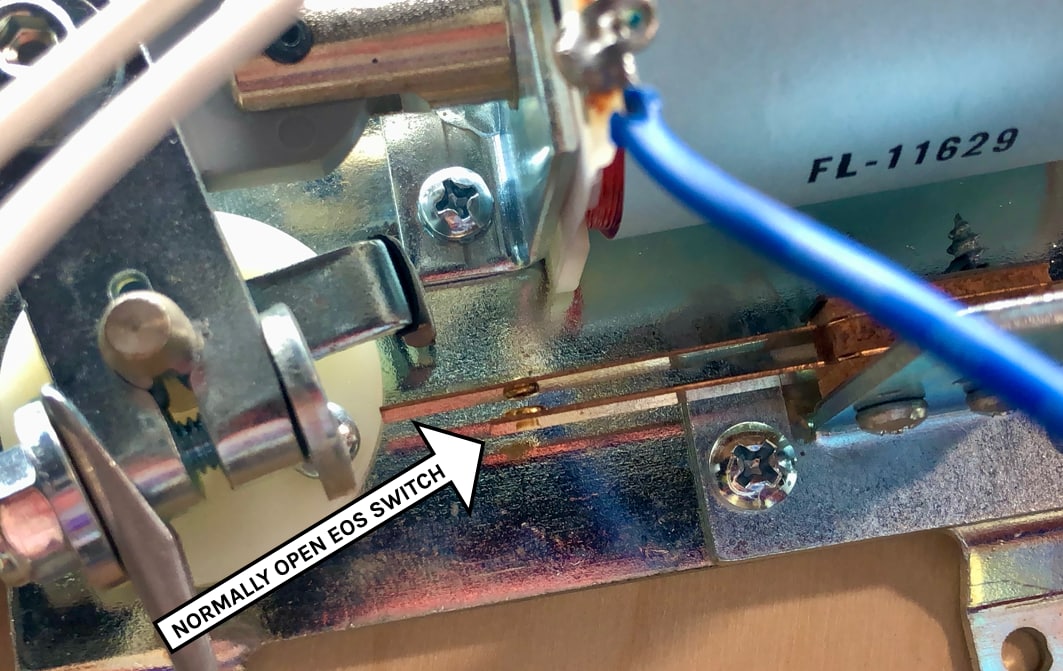
Note that if you're repurposing and older machine or older mechanism, several EOS switch designs have been used over the years, with some being normally open and some normally closed. Either is fine from the FAST Pinball standpoint since you can configure your FAST hardware to invert the switch reading, but just be aware you could see normally open or normally closed EOS switches out there.
We should point out that the way the EOS switch works with modern FAST hardware is very different than in the old days. In the old days, the EOS switch was mechanically connected to the flipper coil's power wires, so it was "dumb" in that it mechanically tied disabling the power winding with the flipper being all the way up. In the modern FAST era, the EOS switch is connected to a switch input on a FAST I/O board, just like any other switch. When it's activated, a microprocessor on a FAST board processes it and then decides what action to take, which in the case of an EOS switch would be to cut off power to the main coil winding. (By the way, if you do have an old flipper mech with the EOS switch wired into the coil, you might be able to unsolder all those wires and wire the EOS switch up like a normal switch. Remove any diodes on the switches but keep the diodes on the coil lugs. However, many EOS switches designed to cut off the high-voltage power have a coating on their contacts that will prevent them from working reliably with the lower switch voltage of the FAST modern platform. So you might have to replace the EOS switch with a new one in that case.)
There are several advantages to using an EOS switch in the modern era with a machine powered by FAST Pinball hardware. All of them are related to the fact that it's nice to have positive feedback for the machine so it knows whether the flipper is fully up or not.
First, using an EOS switch can help prevent your flipper coils from overheating. The reason for this is that the resistance (and therefore the flipping speed) of a flipper mechanism changes as it heats up with increased use. The resistance of copper wire increases with heat, resulting in less current at the same voltage (remember ohm's law?), meaning it will take longer for the flipper to go fully up. (So you end up with less current, but for longer periods of time.) Hotter coils can also lead to expansion in the rod and nylon sleeve, which can increase drag and slow down the flipper action. Without an EOS switch, game designers are forced to pre-compensate for this by running their initial pulses longer than they need to in order to account for a "worst case" scenario, which can ultimately lead to even more heat and worse performance. If a lot is happening in the game, that coil could heat more and more, and you end up with a situation known as "thermal runaway" (honestly do you even need to google that to know it is definitely not good?), burned coils, or seized flippers. Not having EOS switches doesn't mean you'll have these problems, but it's a quick and simple way to ensure your control system is applying just the right amount of power at all times.
Another advantage of using the EOS switch is that since the FAST controller is configured to know that EOS switch and the flipper button are used with the dual-wound flipper coil, if the EOS switch ever opens while the flipper button is closed (for example, a fast-moving ball hits the flipper and "breaks" the hold), then the FAST controller can instantly reapply power to the power winding to get the flipper back up, certainly before the flipper makes its way all the way back down and much faster than the player could react to and do on their own. If you didn't have an EOS switch, then you wouldn't know this happened and the player would have to release and re-press the flipper button. (And in this case, the power only needs to be applied for the few milliseconds needed to get the flipper all the way back up, rather than the full initial kick.)
Also when single-wound flipper coils are used without EOS switches, there's no feedback to let the system know the flipper was accidentally knocked down which causes game designers tend to overcompensate by increasing the hold power. (Sort of a "25% seems like a strong enough hold, so let's dial it up to 40% just to be safe.") The problem there is now you're potentially putting extra power into your hold, which leads to more heat...
One of the perceived downsides of using EOS switches is people think that means you can't tune the power of your flippers. This was true in the old days when the EOS switch was mechanically wired into the coil power path, but it's not the case today. Let's say your flipper power strokes are set to 15ms pulses. If that's too strong, you could dial it down to 14ms. Even if it really takes 15ms for the flipper to get to the top and hit the EOS switch, a 14ms pulse will be gentler but will still probably have enough power for the flipper bat to coast fully up. You can go as low as you want and see what feels right, even if you have an EOS switch. Then on the other side, if you want to dial your power up, you can crank up that initial kick as high as you want. Heck, make it 20ms! Because if that flipper bat gets to the top of its stroke after 17ms, then it's going to hit the EOS switch and the power winding will be cut off. In this case, that's perfectly what we want. Since the flipper is that the top of its stroke, keeping the main winding powered for those extra 3ms doesn't add any more power (it's already up!), but it would add extra heat, which the EOS switch will prevent by cutting it off.
Finally, a little future reveal for people who are really reading this far. :) A future feature we're planning to add via a software update is for the I/O board to track (and be able to report) the timing from the moment the power winding is activated until the EOS switch is activated. Since FAST I/O boards have their own local microprocessors on them, we can be extremely precise with this measurement. This will allow us to do things like notify the operator that a coil sleeve is wearing out ("the right flipper used to flip in 12ms and now it's 14ms"), or that the flipper overheating ("after 20 flips in 60 seconds, the flipper's action time decreased 3ms so something is weird"). This new flipper control code will be specialized and designed just for flippers, implemented via a state machine which will require a dual-wound flipper with EOS switch to get the most from it.
Honestly the only downside to using EOS switches is it will require an extra switch input on your I/O boards. Hopefully it's very clear that we believe this is worth it and absolutely recommend that you wire up and use EOS switches in a FAST Pinball powered modern machine.
Controlling more than two flippers
If you have more than two flippers in your machine (an upper flipper, for example), you need to decide how it will be will be controlled. The main point to consider is whether you'll have a single flipper button which is configured to operate both flippers on the same side of the machine, or whether you'll have a "two-stage" flipper button, where you push the button in part way to activate the main flipper and a little further to activate the upper flipper.
We suggest the two-stage approach, for a few reasons.
First is the two stage approach means those two flippers are not technically activating at the same time. Even if a player hits the flipper button really hard, there will be a time delay between the main flipper switch and upper flipper switch being activated. With flipper main winding pulses being as short as they usually are (15ms?), it's possible that your two flippers' main windows won't overlap, or if they do they will just be for a few milliseconds. This will let you conserve reserve power from the capacitors on the power filter board since you won't have as much of a high current draw at the same exact instant.
Second is that many players use the two-stage aspect to be able to independently control upper flippers while cradling a ball with the main flippers, and this isn't possible if you only have a single button controlling both flippers.
Really the only downside is the two-stage flipper button requires an extra switch input and switch wiring.
Flipper buttons: mechanical or opto?
The final consideration for flipper wiring is whether you'll use mechanical electrical leaf switches or optos for your flipper buttons. Of all the recommendations we have around for flippers, this is the one that's least important to us, so if you have strong feelings one way or the other, do what you want. Our experience has been that optos are more annoying than mechanical switches as flipper buttons. They tend to get dirty and blocked and require more cleaning maintenance, they're difficult to know whether they're working properly or where the issue is when troubleshooting, and stray infrared light can leak in and interfere with them. Also mechanical flipper buttons have been used for 70 years, and most (but not all) manufacturers use them today. The old tale of sparking and carbon buildup doesn't apply to modern low-voltage DC switches. Mechanical switches also don't need extra boards, wiring, and 12 volts like optos do.
Some people have suggested that optos are "quicker" because there's less bounce with a blade breaking a light beam versus a mechanical electrical connection. There's information on the internet about this, but it's from the world of gaming keyboards which use different mechanisms for both types than pinball flipper buttons, so we don't believe those findings translate to pinball. Doing our own research with an oscilloscope and pinball switches a few years ago demonstrated that pinball optos have just the same amount of "bounce" as mechanical switches. We were surprised at first, though it makes sense after you think about it, because for the few milliseconds while the blade is partially blocking the light beam, there are variable shades of light that are on the edge of the receiver's detection threshold, and the receiver itself is a transistor which has to activate over time, so really from the I/O board perspective an opto receiver's electrical signal isn't any different than a mechanical switch.)
Again, we will enthusiastically support whatever choice you make, but for us, mechanical flipper switches seem like the way to go.
Why do the flippers flutter when I power off the machine?
You may notice that when you turn off the power for your machine, the flippers (or possibly other coils) partially activate. This is called a "runt pulse", and can safely be ignored. If you want to understand the science as to why it happens, it's explained fully in the driver wiring guide.
This guide is part of our complete series on wiring your FAST Nano-controlled pinball machine. Click to see the rest!
Wiring guides for FAST Nano-controlled pinball machines
We have many guides and a complete wiring walk-through for your entire pinball machine powered by a FAST Nano Controller. Please read and understand all of the wiring guides before you start planning and physically wiring your machine.
Baseline wiring skills & knowledge
Important wiring and electrical background information you need to know before you start planning your machine's wiring.
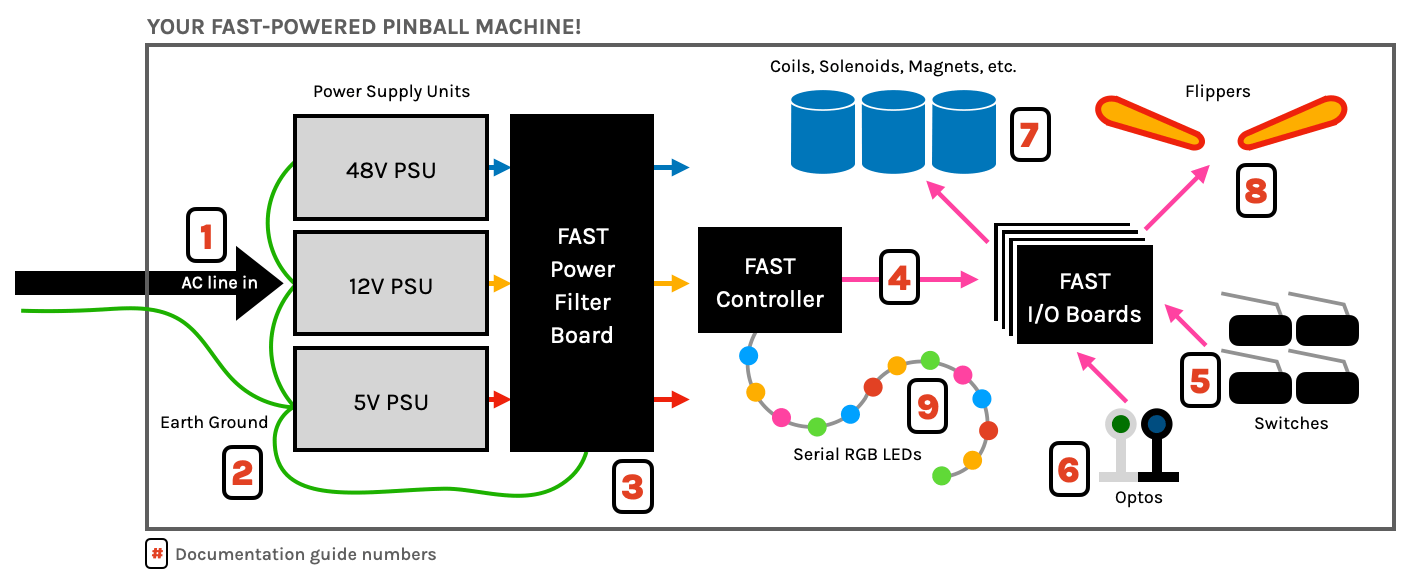
FAST Nano-controlled Pinball machine wiring guides
The guides below walk you through a complete machine wiring, section-by-section. The numbers in the drawing match up to the numbers in each diagram. We assume you follow these in order. Click the image to zoom in.
N or > jump the next page, P or < for previous, search with S or ?