FAST Pinball Nano controller: First unboxing & connection tutorial
You just bought a new FAST Pinball Nano controller and took it out of the box. Now what? This guide will show you how to connect to it from your computer and send some basic commands.
We have both a video version and a written version of this tutorial. The video version is below, and under the video we a have written step-by-step guide with screenshots.
Prerequisites
This tutorial assumes that you have a FAST Nano controller and that you have a way to get 12V and 5V power to it.
You can connect to your FAST Pinball Nano controller from any type of computer. In this guide, we will show you the specific steps for both Windows and Mac, and we figure that if you're using Linux then you will know what to do based on the steps we outline here. :)
Step 1: Connect the wires
For this first step, all we're going to do it connect to your FAST Pinball controller. In this guide, we're going to use a FAST Nano controller. There are only two connections you need to make right now.
-
Connect power to your FAST Nano. The Nano gets its power from its 7-pin 0.156" header, and it requires 12V, 5V, and grounds for both. So you'll either need to make a cable to connect the Nano to your power supply or hook it up to your bench supply.
-
Connect the FAST Nano to your computer via USB. The Nano has a USB mini connector.
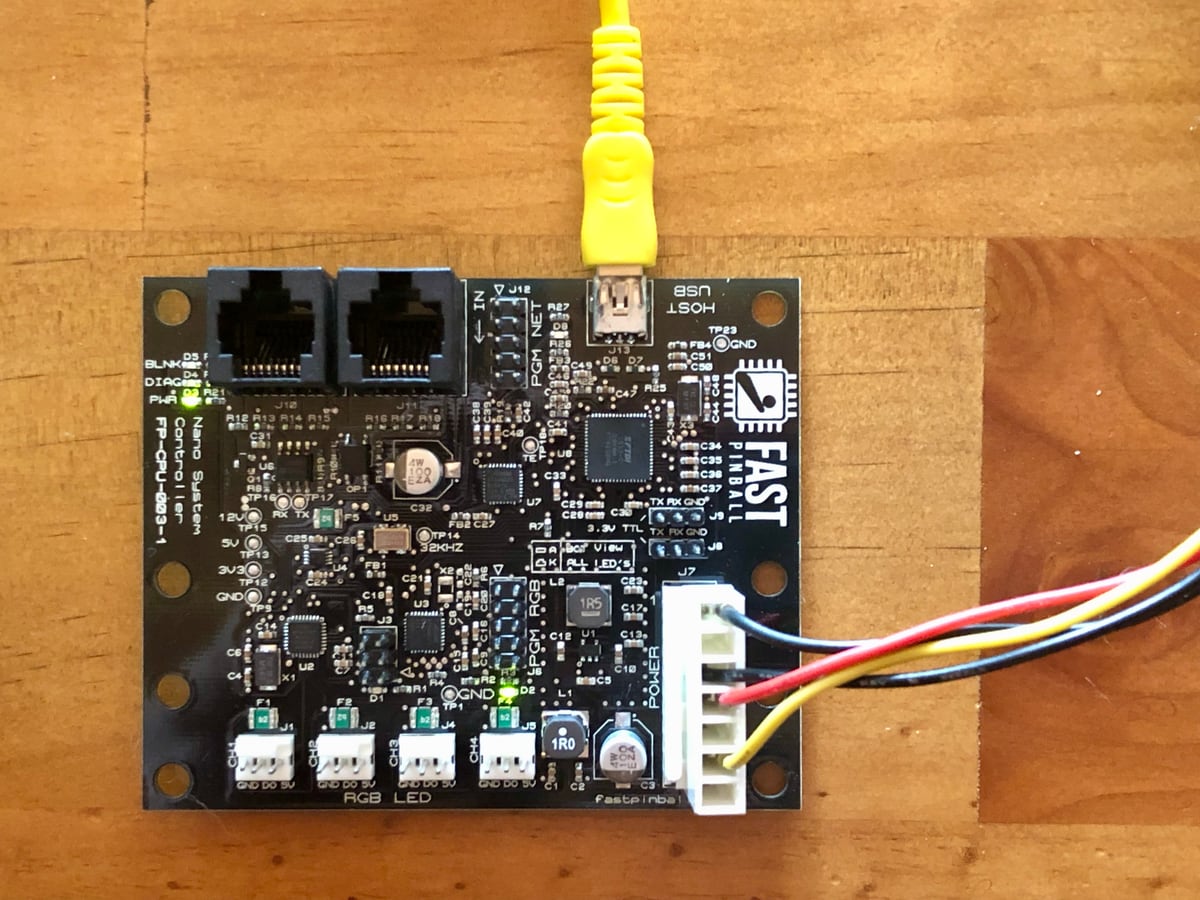
When you connect the Nano to power, you should see the  PWR LED come on, as well as another flashing LED (D2) near the LED CH4 connector.
FAST Pinball controllers do not require any drivers. When you power the controller up and plug it into your computer, on Mac or Linux you won't even get notified of anything. On Windows you'll see a popup letting you know that a new device was found.
Click the "Mac" or "Windows" tab below to see screenshots for your specific platform.
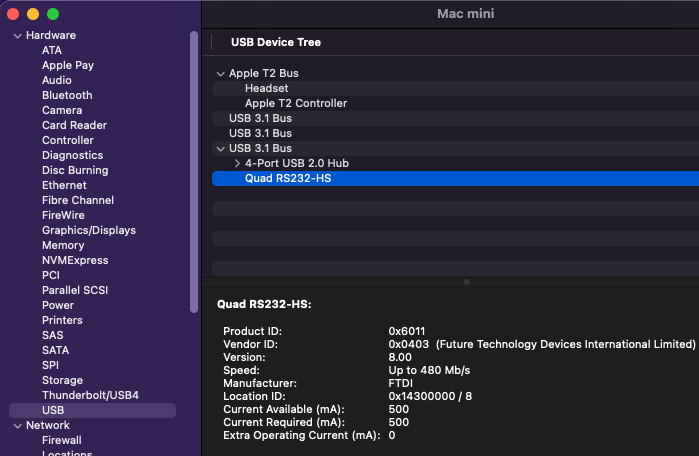
On a Mac, you should sew a new device, "Quad RS232-HS" in the USB section of the System Information tool.
When you connect the FAST Pinball controller and power it on, you should see a popup like the one on the left below, and then shortly like the one on the right:

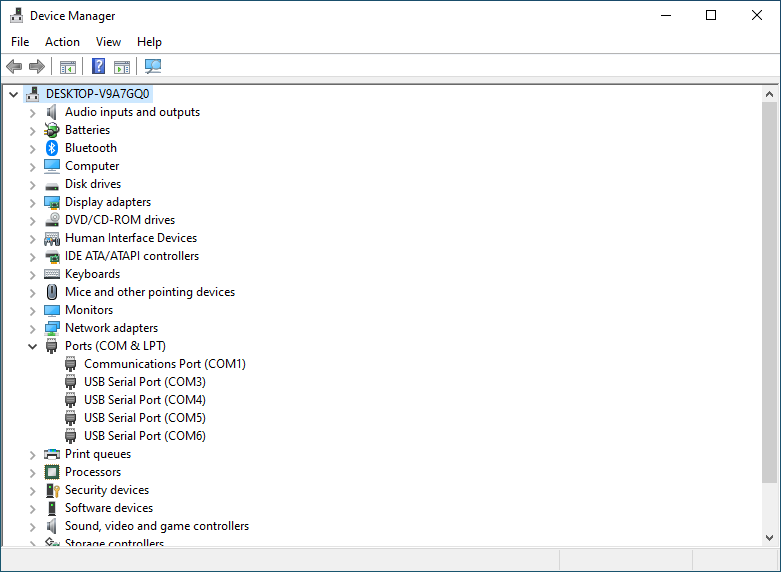
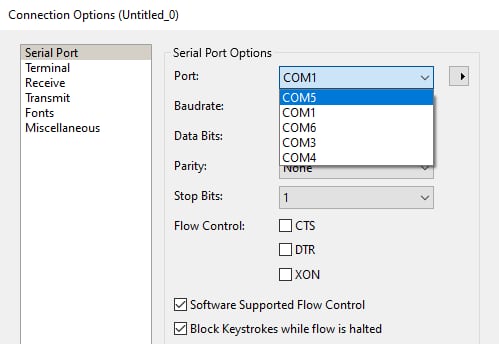
Then you should see four new COM ports in your device manager. (Note that your port numbers might be different)
Step 2. Get a terminal emulator app
Since all communication to a FAST Pinball controller is via these virtual serial ports, you can actually get a terminal emulator app and interactively type and send commands to the controller! If you have a favorite terminal emulator, go ahead and use it. If not, we like CoolTerm because it's free and there are versions for Mac, Windows, and Linux.
Download and install CoolTerm to follow along here. If you're using a different terminal emulator, just configure it for the same settings we discuss here.
Step 3. Configure CoolTerm
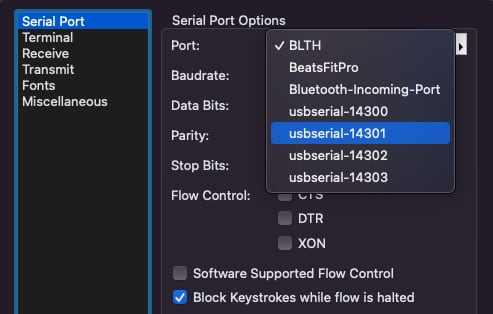
When you open CoolTerm, you should see an empty window. Click the "Options" icon from the toolbar which will open a configuration screen. On the "Serial Port" page, you'll see a "Port:" section with a drop-down list of serial ports. Click that and you should see the four serial ports from the FAST Nano controller. (The various boards in the FAST Modern platform have several different microprocessors in different places. The four serial ports allow the computer to talk to the various processors on the FAST boards.)
For this step, we want to select the second port (in numerical order) from the four Nano ports. (Note that the order your ports show up probably be random, you want to pick the second numeric port.)
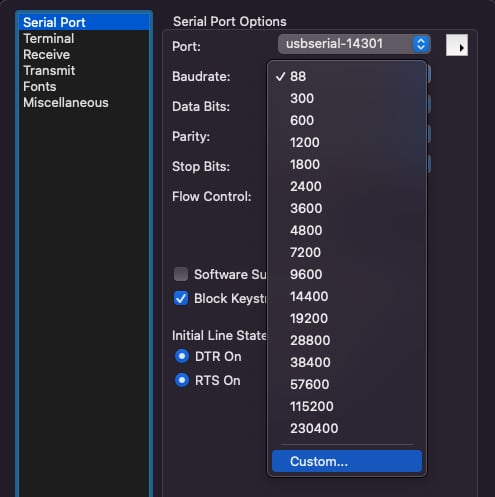
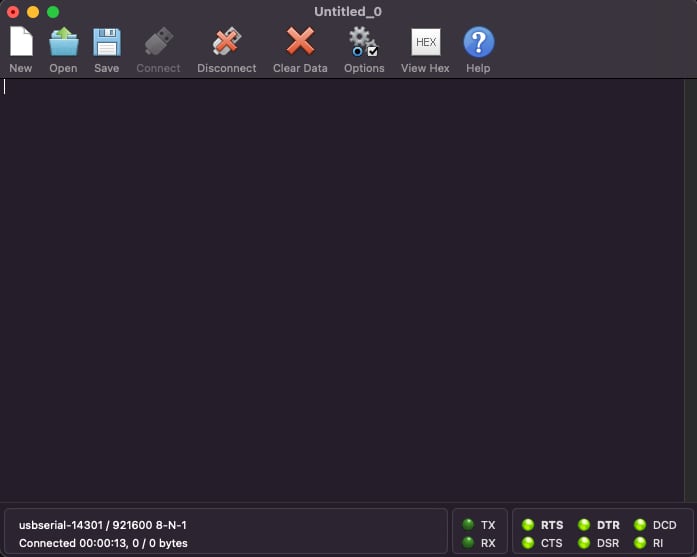
The four usbserial-1430x ports are the Nano's ports. The actual port names will certainly be different on your computer. We would select the usbserial-14301 in this example:
The four new ports that appeared from the Nano are COM3, COM4, COM5, and COM6. (So the second port to pick in this case is COM4. The actual port numbers may be different on your computer. You can plug and unplug the Nano to see which ones are its. Your guess as to why these ports are out of order in the list is as good as ours!
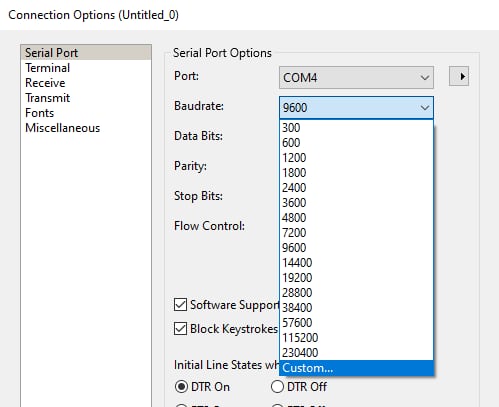
Next, click the "Baudrate" dropdown box. as shown in the next screenshot down.
- Select "Custom..."
- Enter
921600
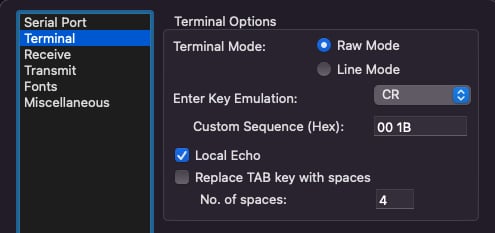
Next, click on the "Terminal" section in the left-side pane.
- Terminal Mode should be
Raw Mode - Change the Enter Key Emulation to just
CR - Check the box to enable Local Echo
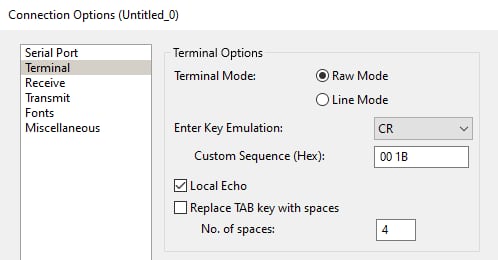
The settings, in summary:
- Four new serial ports show up when you connect the Nano. Select the second one (in numeric order) from the list.
- Serial Port settings: Baudrate
921600, Data bits8, ParityNone, Stop Bits1. - Terminal settings: Terminal Mode:
Raw Mode, Enter Key EmulationCR, Local Echo:Checked (Yes)
At this point you are ready to connect. You can verify the port name and settings via the lower-left corner:

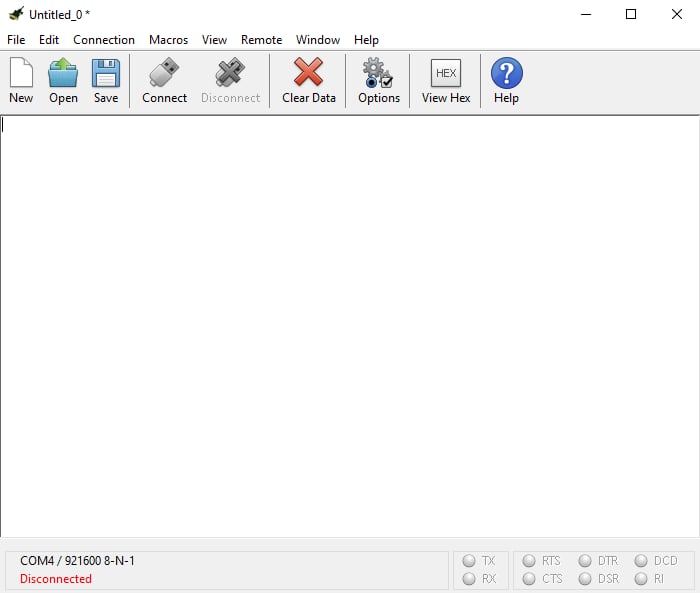
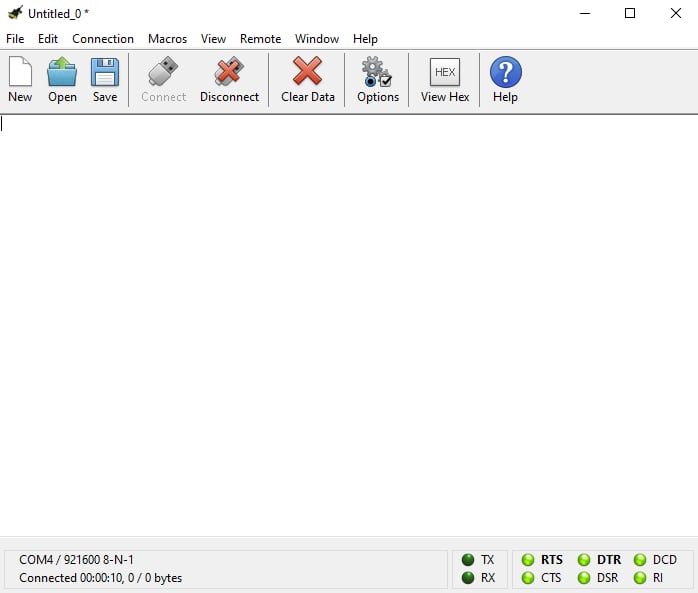
Click the "Connect" button in the toolbar. Aaaaannnddd.... Well, it looks like nothing happens. But you should be connected! You will notice it says "Connected" in the lower left corner and a timer is running, and some of the status "lights" in the lower right corner are green.
Step 4. Send some commands to the Nano
Now you have an interactive terminal you can use to talk to the FAST Controller. You can send commands and see results in real time. For example, let's verify the ID of the Nano. To do this, type id: and hit Enter. You should see a response from the Nano which looks something like the response in the screenshot below. (A full explanation of what this means and how to interpret what you see is after the screenshot.)
If you don't get a response, or your response doesn't start with FP-CPU, that means you selected the wrong serial port. You want the numerically second port in your list, and note the list of ports may not show in order on your computer.
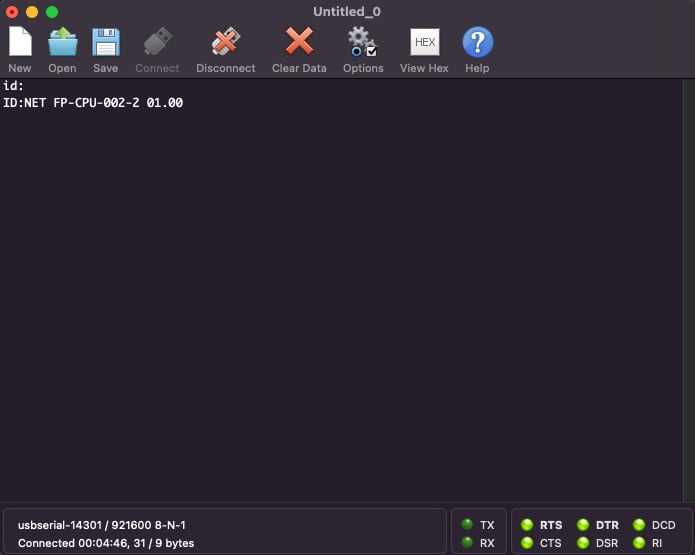
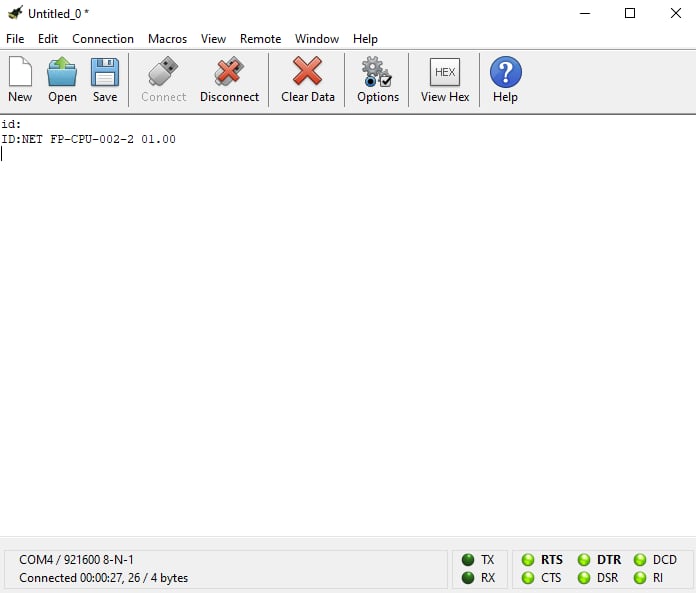
In the example above, the response from the Nano is ID:NET FP-CPU-002-2 01.00.
There are four pieces of information in that response:
ID:This is telling you what type of response this is. Most responses match the command that was sent. (e.g. you sendID:, the response comes back starting withID:)NET:You are connected to the "NET" processor of the Nano (which is the one connected to the second of the four virtual serial ports). The NET processor is responsible for communicating with the FAST I/O boards over the FAST I/O Loop.FP-CPU-002-2is the product ID (the part number) of the board you're connected to. FP-CPU-002-x is a Nano. You can use the part number index if you want to see the part number for what you're connected to.1.00is the firmware version that the processor you're connected to is running. You can see the latest version of firmware available for that processor on our firmware page.
Troubleshooting
What if you can't connect to your Nano? Verify the following:
- Is the Nano receiving power? There should be a green light on it and also a flashing light.
- Is the Nano connected to your computer via USB?
- Did you select the proper serial port? It should be the second-lowest numerically of the four that show up.
- Did you set the baud rate to
921600? - Did you configure the other terminal settings, specifically Local Echo and that the Enter key sends
CR? - Did you actually hit the "connect" button in the toolbar and connect?
If you're still stuck, reach out to us and we'll help (and update this doc!)
What is this XX:F stuff?
You might notice some other random messages on your terminal screen. Any response you get from the FAST Pinball controller that ends in an :F is telling you that the command failed. This usually means you typed in a command that was not valid.
So for example, if you type hello Enter, you'll get an XX:F command which is telling you the command was not recognized and failed. It will look like this:
hello
XX:F
Note that from this point on, rather than showing you screenshots from Windows and Mac, we're just showing the actual content of the terminal window since it's the same for everyone.
If you just hit Enter without any command, you'll get an XX:F since you're sending blank commands which are not valid. You might get other types of responses depending on the letters of what you send. The bottom line is that anything that ends in :F failed. You can just type the id: command again at any time.
hello
XX:F
id:
ID:NET FP-CPU-002-2 01.00
But now you're connected! It's very boring, but functional. Next let's hook up your I/O boards (node boards) and make sure we can connect to them.
N or > jump the next page, P or < for previous, search with S or ?