How to wire earth ground in a FAST Nano-controlled pinball machine
Wiring, high voltage, and electricity can be dangerous. Read this first!
The voltages and electricity discussed here can be dangerous and could cause property loss or death. It is your responsibility to ensure you are aware of these risks and comfortable with these processes. Furthermore your local jurisdiction may have regulations or rules which differ from what we discuss here, including wiring colors, standards, techniques, etc. Although based on broadly adopted methods, FAST Pinball does not employ Professional Engineers and this information is not professional recommendations. There may be errors, omissions, or typos here. Any pinball machine available to the general public should be reviewed by a licensed Professional Engineer in your region. Use this content at your own risk.
This guide is old (for FAST Nano-powered machines only)
This wiring guide is for pinball machines powered by a FAST Nano Controller. If you have a FAST Neuron Controller, please see the Neuron wiring guide.
This guide shows you how to wire the earth ground in your FAST Nano-controlled pinball machine.
Before you read this guide, you should read these others first:
What is earth ground?
Earth ground is ultimately a connection to the physical ground of planet Earth. In your house, it's the third prong of an AC plug, and in your walls this is connected to the literal ground via a thick copper strap going to a water supply pipe or to a metal stake driven into the ground.
In a pinball machine, every big metal cabinet part must be connected to earth ground. This is so important that most pinball shows test for this in all the pinball machines that are brought to the show, and any machine that fails this test is not allowed to go on the floor. This is a simple test, just unplug your machine and set your meter to continuity mode, touch one probe to the ground pin on the machine's power cord, and then use the other probe to touch any metal part--the lockdown bar, legs, hinges, coin door, etc. You should get the continuity beep, and if you don't, that means that metal part is not connected to earth ground and the machine will not be allowed on the show floor.
Why does this matter? Imagine a +48V supply wire comes unsoldered and falls down and touches a metal part that a human could also touch. If that metal part, the power supply toxic ground, and earth ground are all connected, then that will instantly cause a short circuit and blow a fuse or vaporize whatever that wire was touching. (Remember from our Guide to fuses in pinball machines that a blown fuse is a good thing because it means we used a 5-cent fuse to protect something much more expensive or dangerous.)
Now imagine if that +48V wire fell onto a metal part that was not connected to earth ground. That would mean that metal part now has high voltage potential. And if the player was unfortunate enough to have one hand on something that was connected to earth ground (the lockdown bar), and then touch the other part that has now has the high voltage potential that's not connected to earth ground (the plunger collar), then the human would be the connecting wire between that high voltage and ground and they would get shocked.
So again, very, very important, and you won't even be able to get your machine into a show if you don't have it wired to earth ground appropriately.
The other important thing about earth ground is that is must not carry any voltage at any time! It purely exists as a safety measure. Over the years there have been some third-party mods for existing pinball machines with clips that would tie into the ground braid. This is very bad. Do not do this in your machine. Earth ground is not a logical electrical ground.
Ground braid
The way earth ground is handled in a pinball machine is with a ground braid wire. You can open any modern machine and see it. It is a long flat braided wire that runs all throughout the machine and is stapled or attached to everything metal--the backs of the legs, the coin door, the lockdown bar, the vent grills, the power supplies, the plunger, etc. Here are some photos from a Chicago Gaming Attack from Mars remake with arrows pointing out the various earth ground components:

Note that the ground braid itself connects to a lot of things, and that additional ground braids are stapled to other ones. Also note that running the braid between something metal and the cabinet is ok, and also if there are things which need to connect to earth ground where the braid doesn't make sense, green wires and screws are ok too.
If you have external metal parts that are powder coated, anodized, or painted and which don't conduct electricity on the outside, you still need to connect them to your ground braid. You can do this by connecting to a section of the part that was masked, or by scraping off some of the coating on an inside area so you can get a good ground connection. (The reason for this is that if the coating or paint wears off, then conductive metal could be exposed to the outside so you want to make sure it's tied to earth ground.)
You need to attach this ground braid to the actual earth ground (which comes into the pinball machine via the green wire from the AC mains connection). The easiest way to do this is to run it under your power supplies since their metal enclosure is connected to Earth ground via the green wire from the wall as you can also see in the photo above. Run one of the screws holding your power supply to the cabinet through the ground braid, and then let several inches of the ground braid get sandwiched between the power supply and the cabinet bottom.
Note that you are not allowed to connect your ground braid to a terminal block or screw, since the braid is braided, it could fray and short circuit by touching a neighboring terminal. But if you want to have an earth ground terminal strip instead, that's fine, and you can get a crimp-on connector for your ground braid with a fork or ring terminal to connect to your terminal strip.
It's also important that you have a ground braid in your backbox which you connect to your speaker panel, the metal frame of your display, the latch, any metal mounting plates for your boards, etc. Make sure you connect the ground braid in your backbox with the ground braid in your cabinet, either by a thick wire and ring going to the head bolts or some other way to ensure they're connected.
Should you tie your earth ground to DC power ground?
One of the debates in the homebrew pinball community is whether you should connect your earth ground to your DC power ground. If you're getting your machine certified (UL listed, FCC, CE, etc.) then the answer is simple: do whatever the inspector tells you to do! But if you're just building a homebrew machine that will not be certified, you will have leeway to choose.
Unfortunately it's impossible to provide blanket guidance since there are so many variables and things that affect whether you should tie earth ground and DC power grounds together. But we want to be very clear that most of the guidance for grounding is straightforward. It's only this last question that depends. So, to summarize:
- Do you tie all your DC grounds (48V, 12V, 5V) together? YES, ALWAYS! (More details are in subsequent wiring guides)
- Do you need a ground braid which touches all metal parts, your PSU chassis, and the AC ground input? YES, ALWAYS!
- Should you connect the DC grounds to the earth ground? MAYBE, IT DEPENDS.
In the United States, the NEC regulations dictate that tying DC ground to earth ground is required if your DC voltage is higher than 60V. So this is why you'll see this tie in classic 90s machines which had lots of voltage levels over that. But the modern machines we're building most likely don't exceed 48V, so there's not a hard requirement there. (Obviously if you have more than 60V then you tie them together and your decision is simple!)
The main benefit of connecting DC ground to earth ground is safety. When they're connected, if any high-voltage +48V wire becomes disconnected and touches anything metal (which will, of course, be connected to the ground braid), the fact that its DC ground is connected to earth ground means the disconnected wire will have a path to ground and will blow a fuse. This is what you want. (Why? Because we want to blow a fuse instead of letting the current flow through this unplanned path and heating or melting something.)
Another advantage to tying the two together is that in electrically-noisy environments, tying everything together keeps the ground reference stable with regards to the noise. (In fact connecting DC ground to earth ground is a recommended technique to mitigate noise like this.)
So for these reasons, we generally recommend that YES, you should connect your DC power ground to your earth ground. But if your local jurisdiction, rules, inspectors, and/or specifics of your machine lead you to not want to make this connection, that is fine too. Do what you're most comfortable with.
How to connect earth ground to DC power ground
If you decide to connect your earth ground to DC power ground, here are some best practices.
- Only tie DC ground and earth ground together at ONE point with one wire.
- Tie the DC ground in as close as possible (in the schematic flow) to your earth ground. So either a ground zero terminal strip, or into an unused ground on the FAST Power Filter Board, or on one of the PSUs itself.
How you do this depends on your setup. It could be as simple as running a short jumper wire from the earth ground input on one of your PSUs to one of the DC negative / ground terminals. You could just use a little 2-inch wire with fork connectors on each end, as shown in the diagram below. (The green/black striping is just so you can see which wire we're referring to. You can just use green.)

All of the grounds (on both the input and output side) of the FAST Power Filter Board are tied together, so if you're using that as your ground zero reference point and you have an extra GND pin available on one of the connectors, you could run a green wire in there and then tie that back to a PSU's earth ground, or whatever terminal or lever wire connector your using. (So be sure to leave one extra connector space on your earth ground connector.)
This guide is part of our complete series on wiring your FAST Nano-controlled pinball machine. Click to see the rest!
Wiring guides for FAST Nano-controlled pinball machines
We have many guides and a complete wiring walk-through for your entire pinball machine powered by a FAST Nano Controller. Please read and understand all of the wiring guides before you start planning and physically wiring your machine.
Baseline wiring skills & knowledge
Important wiring and electrical background information you need to know before you start planning your machine's wiring.
FAST Nano-controlled Pinball machine wiring guides
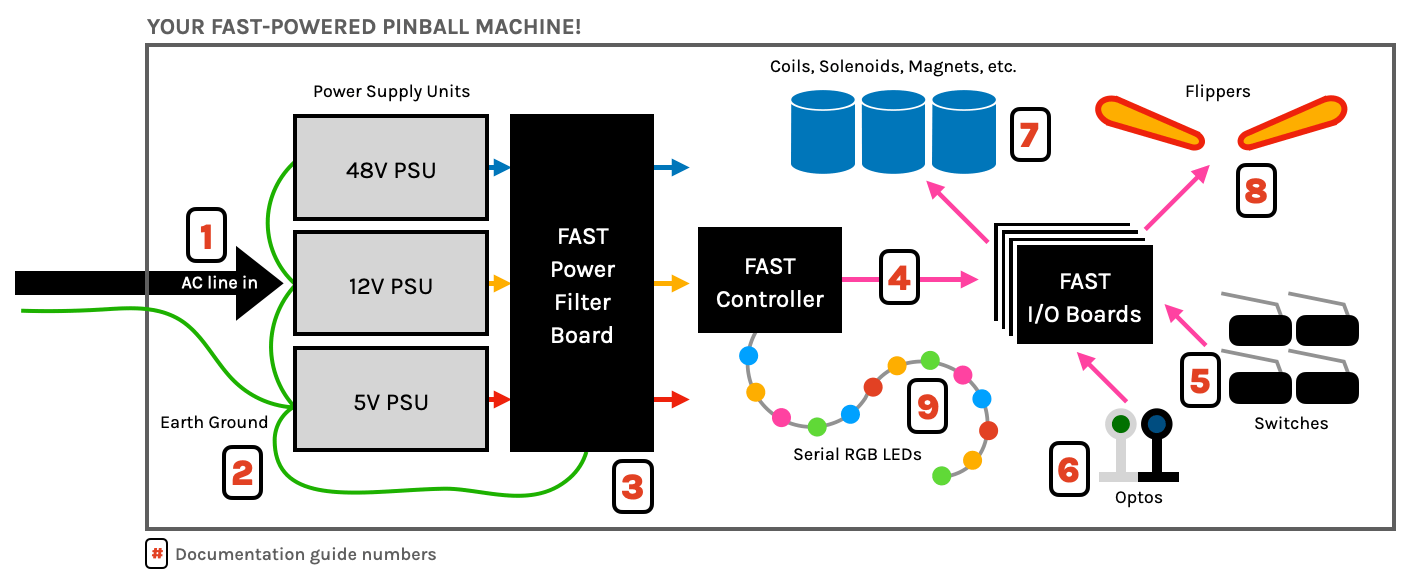
The guides below walk you through a complete machine wiring, section-by-section. The numbers in the drawing match up to the numbers in each diagram. We assume you follow these in order. Click the image to zoom in.
N or > jump the next page, P or < for previous, search with S or ?