How to wire your FAST Nano Controller and I/O Boards
This guide shows you how to wire and connect your FAST PinballNano Controller, your I/O Boards, and other auxiliary boards.
Wiring, high voltage, and electricity can be dangerous. Read this first!
The voltages and electricity discussed here can be dangerous and could cause property loss or death. It is your responsibility to ensure you are aware of these risks and comfortable with these processes. Furthermore your local jurisdiction may have regulations or rules which differ from what we discuss here, including wiring colors, standards, techniques, etc. Although based on broadly adopted methods, FAST Pinball does not employ Professional Engineers and this information is not professional recommendations. There may be errors, omissions, or typos here. Any pinball machine available to the general public should be reviewed by a licensed Professional Engineer in your region. Use this content at your own risk.
This guide is old (for FAST Nano-powered machines only)
This wiring guide is for pinball machines powered by a FAST Nano Controller. If you have a FAST Neuron Controller, please see the Neuron wiring guide.
Before you read this guide, you should read these others first:
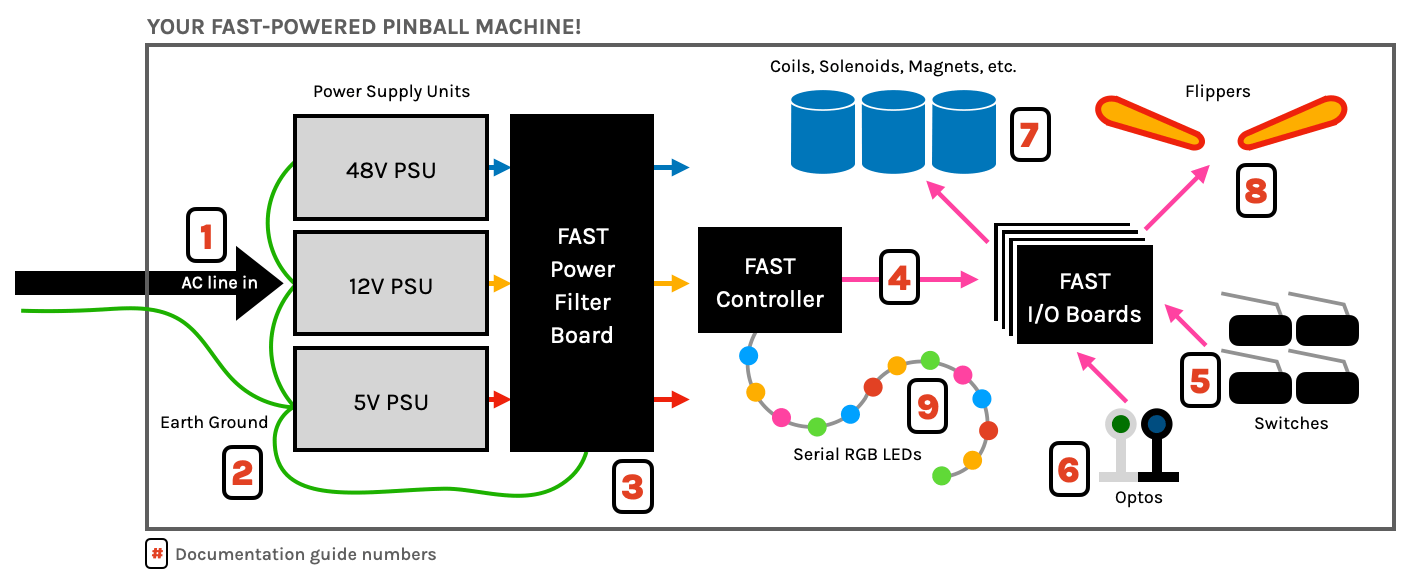
We also assume that you've been following along in order, and that you have your AC lines, power supplies, and FAST Power Filter Board all wired up. The guide you're reading now focuses on the "machine-side" of the power filter board, stepping through the connections needed for each FAST board.
FAST Nano Controller
Full specs, diagrams, and details of the FAST Nano Controller can be found in the product manual. What we're covering here is just related to wiring.
The FAST Nano Controller requires 12V, 5V, and the clean (low power) ground. In addition to using those voltages to power itself, the Nano uses 12V to power the I/O boards (via the Cat-5 cables making up the FAST I/O Loop), and it uses 5V to power the serial LEDs.
We recommend running two black ground lines from your Nano back to the ground tie point. Why? Because if the Nano's path to ground fails, it will try to find a path to ground somewhere, and there's a good chance it will do that via the FAST I/O Loop of Cat-5 cables. The I/O boards are designed so their grounds float (details in the next section), and a floating ground on the Nano would not be good. You can easily avoid a single disconnected ground line ruining your day by running a second. The pin is already there, it will cost you about 2 minutes and 10 cents. Done!
If you have a lot of LEDs (more than about 3.5A worth, maybe more than 100 or so?), you should wire a second red +5V power line to your Nano as well. (See the cabinet wiring guide for details.) Also if you have more than about 20 LEDs in a chain, you'll need to attach a red +5V power and a black ground wire to the end of the chain, and maybe even one or two to the middle of the chain. This is covered in the guide to LED wiring.)
The second +12V pin on the Nano's power header is just so the pinout matches the WPC power header. You only need to use one 12V power line.
I/O Boards
FAST I/O boards have several types of wiring connections:
- CAT-5 cables making up the FAST I/O Loop (discussed here)
- Switches & optos (discussed in the next guide)
- Drivers & coils (discussed after switches)
The FAST I/O Loop is the term we use to describe the ring network of CAT-5 cables which connect all your I/O boards to your FAST Controller. More details about the design decisions we made, and a full description of the FAST I/O Loop can be found in the FAST Modern Platform documentation. Since the guide you're reading now is a wiring guide, we'll cover just the wiring aspects of the FAST I/O Loop.
Important notes when connecting your I/O boards via the FAST I/O Loop:
- The individual cables are regular Cat-5 Ethernet cables with RJ-45 end connectors.
- The FAST I/O Loop is NOT Ethernet, it just uses Ethernet cables. Do not plug anything else into these connectors!
- Connect the OUT from one board to the IN of the next board. Connecting the same cable to two INs or two OUTs won't work.
- You must complete the ring / close the loop. Be sure to connect a final cable from the OUT of your last board to the IN of the FAST Controller.
- Individual I/O boards get their power (12V) from the FAST Controller via the FAST I/O Loop.
- I/O boards can be connected in any order, but the order of the switch and driver numbering is based on the order they're connected, so be sure to label or otherwise make the order obvious.

Other auxiliary boards
Finally, you probably have lots of other little things to connect, such as FAST Opto Emitter boards, a trough IR emitter, etc. Connecting power to these is pretty straightforward. You'll most likely wire the power from your 12V or 5V DC sources at the terminal strips and take their grounds back to the related clean logic grounds for the 12V / 5V on your terminal strips. More details will be covered in the final wiring document about putting it all together.
This guide is part of our complete series on wiring your FAST Nano-controlled pinball machine. Click to see the rest!
Wiring guides for FAST Nano-controlled pinball machines
We have many guides and a complete wiring walk-through for your entire pinball machine powered by a FAST Nano Controller. Please read and understand all of the wiring guides before you start planning and physically wiring your machine.
Baseline wiring skills & knowledge
Important wiring and electrical background information you need to know before you start planning your machine's wiring.
FAST Nano-controlled Pinball machine wiring guides
The guides below walk you through a complete machine wiring, section-by-section. The numbers in the drawing match up to the numbers in each diagram. We assume you follow these in order. Click the image to zoom in.
N or > jump the next page, P or < for previous, search with S or ?